Installation
Please note that, if you open index.html file directly on your browser, it may not work properly. Most browsers restricts the kinds of files that pages can load (and methods of loading) when you open them from a file:// URL. You should upload the folder to your hosting or create local server environment on your computer using a third party app. For example; MAMP.
Folders
Assets: This folder contains images used in design.
CSS: This folder contains all CSS files.
Files: This folder contains all objects and templates hierarchically.
JS: This folder contains all javascript files. All javascript plugins (except FabricJS and JQuery) we've used are in js/plugins.min.js file. You can find the source files in libs folder.
Json: This folder contains a json file which is required for loading "Google Fonts".
Settings
You can adjust settings from js/custom.js file. You can add your custom javascript functions into customFunctions function.
baseURL: "./", // The url of the main directory. For example; "http://www.mysite.com/pmotion/"
PexelsApiKey: '563492ad6f917000010000015fdb98d08f024608bacd72497e5f09e3', // Your Pexels API key. @see https://www.pexels.com/api/documentation/
PexelsPagination: 20, // Max. number of images to show.
PexelsLanguage: 'en-US', // The locale of the search you are performing. The current supported locales are: 'en-US' 'pt-BR' 'es-ES' 'ca-ES' 'de-DE' 'it-IT' 'fr-FR' 'sv-SE' 'id-ID' 'pl-PL' 'ja-JP' 'zh-TW' 'zh-CN' 'ko-KR' 'th-TH' 'nl-NL' 'hu-HU' 'vi-VN' 'cs-CZ' 'da-DK' 'fi-FI' 'uk-UA' 'el-GR' 'ro-RO' 'nb-NO' 'sk-SK' 'tr-TR' 'ru-RU'
PexelsImgSize: 'large2x', // Valid image sizes are; original large2x large medium small portrait landscape
PixabayApiKey: '720935-7e417c770b54e3787204ad9d1', // Your Pixabay API key. @see https://pixabay.com/api/docs/
PixabayPagination: 20, // Max. number of images to show.
PixabayLanguage: 'en', // The locale of the search you are performing. Accepted values: cs, da, de, en, es, fr, id, it, hu, nl, no, pl, pt, ro, sk, fi, sv, tr, vi, th, bg, ru, el, ja, ko, zh
PixabaySafeSearch: 'false', // A flag indicating that only images suitable for all ages should be returned. Accepted values: "true", "false".
PixabayEditorsChice: 'false', // Select images that have received an Editor's Choice award. Accepted values: "true", "false".
apiCaching: true, // Browser caching for API requests. Boolean value: true or false
maxUploadLimit: 10, // Maximum allowed file upload size (MB)
canvasWidth: 1080, // Default canvas width (px)
canvasHeight: 1080, // Default canvas height (px)
fontFamily: "Roboto", // Change only if you've changed the default font family from CSS
borderColor: '#000000',  // Color of controlling borders of an object (when it's active).
borderScaleFactor: 2, // Scale factor of object's controlling borders bigger number will make a thicker border border is 1, so this is basically a border thickness since there is no way to change the border itself.
borderOpacityWhenMoving: 0.5, // Opacity of object's controlling borders when object is active and moving.
cornerColor: '#FFFFFF', // Color of controlling corners of an object (when it's active).
cornerSize: 12, // Size of object's controlling corners (in pixels).
cornerStyle: 'circle', // Specify style of control, 'rect' or 'circle'.
cornerStrokeColor: '#000000', // Color of controlling corners of an object (when it's active and transparentCorners false).
borderDashArray: [4, 4], // Array specifying dash pattern of an object's borders (hasBorder must be true).
editingBorderColor: 'rgba(0,0,0,0.5)', // Editing object border color.
backgroundColor: '#888888', // Default canvas background color
imageLayerColor: '#1B9AAA', // Image layer color on the timeline
videoLayerColor: '#DAA89B', // Video layer color on the timeline
textLayerColor: '#84A9C0', // Text layer color on the timeline
shapeLayerColor: '#87D68D', // Shape layer color on the timeline
animatedTextLayerColor: '#87D68D', // Animated text layer color on the timeline
audioLayerColor: '#E2EB98', // Audio layer color on the timeline
watermark: false, // true or false
watermarkText: 'Made with Pmotion', // The watermark text
watermarkFontFamily: 'Roboto', // The font must be loaded on the first page load or must be a web safe font
watermarkFontStyle: 'normal', // Possible values: "", "normal", "italic" or "oblique".
watermarkFontColor: '#000', // Watermark font color
watermarkFontSize: 40, // Watermark font size (int)
watermarkFontWeight: 'bold', // e.g. bold, normal, 400, 700
watermarkBackgroundColor: '#FFF', // Watermark background color
watermarkLocation: 'bottom-right', // Possible values: "bottom-right",
presets: [
    ['1:1', 1080, 1080],
    ['1:1', 720, 720],
    ['1:1', 600, 600],
    ['4:5', 1080, 1350],
    ['16:9', 1280, 720],
    ['16:9', 640, 360],
    ['9:16', 720, 1280],
    ['9:16', 360, 640],
    ['4:3', 640, 480],
    ['4:3', 480, 360]
],  // Canvas preset; [Ratio (string), Width (int), Height (int)]
colorpickerSwatches: [
    'rgba(244, 67, 54, 1)',
    'rgba(233, 30, 99, 1)',
    'rgba(156, 39, 176, 1)',
    'rgba(103, 58, 183, 1)',
    'rgba(63, 81, 181, 1)',
    'rgba(33, 150, 243, 1)',
    'rgba(3, 169, 244, 1)',
    'rgba(0, 188, 212, 1)',
    'rgba(0, 150, 136, 1)',
    'rgba(76, 175, 80, 1)',
    'rgba(139, 195, 74, 1)',
    'rgba(205, 220, 57, 1)',
    'rgba(255, 235, 59, 1)',
    'rgba(255, 193, 7, 1)'
], // Colorpicker swatches (rgb, rgba or hex)
API Settings
With Pexels and Pixabay integrations, you can browse millions of high-quality royalty free stock images and videos from Pmotion.
Pixabay: You must get an API key from your Pixabay account. Creating account and getting API key is free. After signing-in you can find your API key on this page.
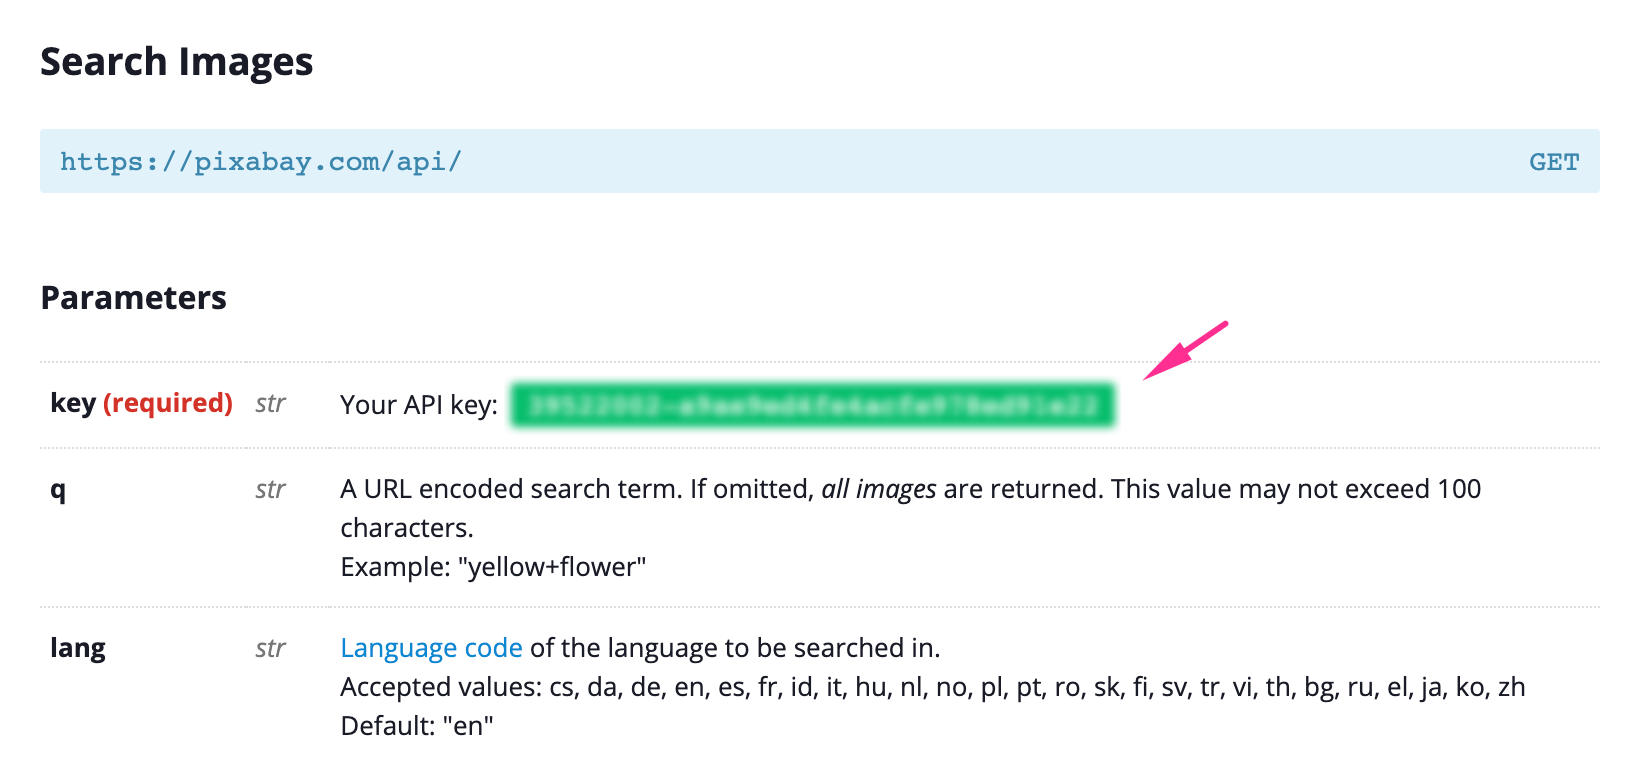
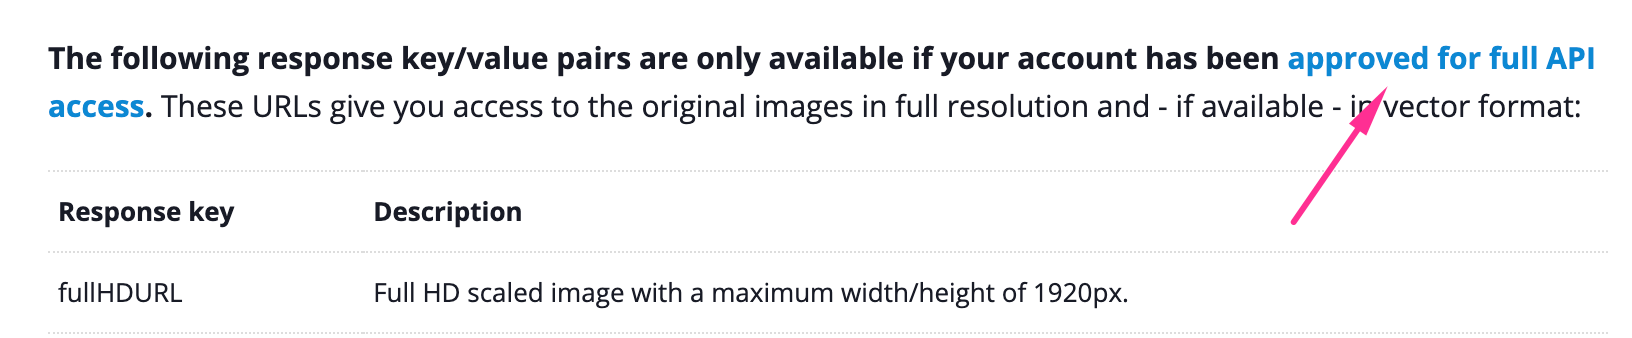
As default image size is a maximum width/height of 1280px. To get the full HD image (maximum width/height of 1920px) url instead, your account should be approved for full API access. You can request full API access from the API page.
Pexels: You must get an API key from your Pexels account. Creating account and getting API key is free. Click here to get your API key.
Basics
You can see all the properties in the settings panel on the left. By default with nothing selected you can access the canvas settings to set the dimensions, background color, and duration. When you select a layer, you will see layer specific settings in this panel.
In the middle of the screen there’s the canvas area, where you can preview your video and interact with the layers directly. To navigate around it, you can use the pan tool by clicking on the hand icon on the bottom right. You can zoom in and out with the mouse wheel or pinching on the touchpad, or by using the zoom in-out buttons.
To make selections, just drag a box around your objects, or click on them directly. You can use the handles to resize or rotate your selections. If you’d like to go back, you can use the undo/redo buttons on the top left.
After you’ve added an asset into the project, you can start animating it. By default all layers are static, so you can move them around and transform them without creating any keyframes. Once you’re ready, you can just click on the clock icon on the respective layer.
The initial keyframes will all be set, and then you can move the layer around at different time points to automatically generate keyframes. Working with keyframes is easy. Just drag the seekbar (or click somewhere in the timeline to jump) to a point in time, transform your selection in the canvas (e.g. by scaling, moving, rotating…), and the keyframes will be automatically generated. You can reposition the keyframes, delete them, or set the easing by clicking on them.
The timeline area is on the bottom of your screen. You can resize it by grabbing the edge up and down, if you need more space to work with. You can also drag the layers up and down to change their ordering in the canvas.
Below the timeline there’s the playback controls. On the left side you can use the zoom level to zoom in or out of the timeline, and the speed dropdown to change the playback speed. You can use the controls in the center to play, pause, and skip.
Templates
How To Add Your Own Templates To The Library?
To add your own templates to "Template Library" area;
1) Create a design with Pmotion.
2) Go to Templates -> My Templates.
3) Click "Export" button to download JSON file.
4) Create a square thumbnail image for your template.
5) Put JSON file and the thumbnail into Files->Templates folder.
6) Add your template to the index.html file like the following;
<div id="template-library" class="css-grid">
...
<div class="image-grid-item" data-template="files/templates/TEMPLATE_FILE.json" title="Template Title">
<div class="img-wrap"><div class="img-loader"></div>
<img class="lazy" src="files/templates/THUMBNAIL_FILE.png" alt="" draggable="false" />
</div>
...
</div>
Uploads
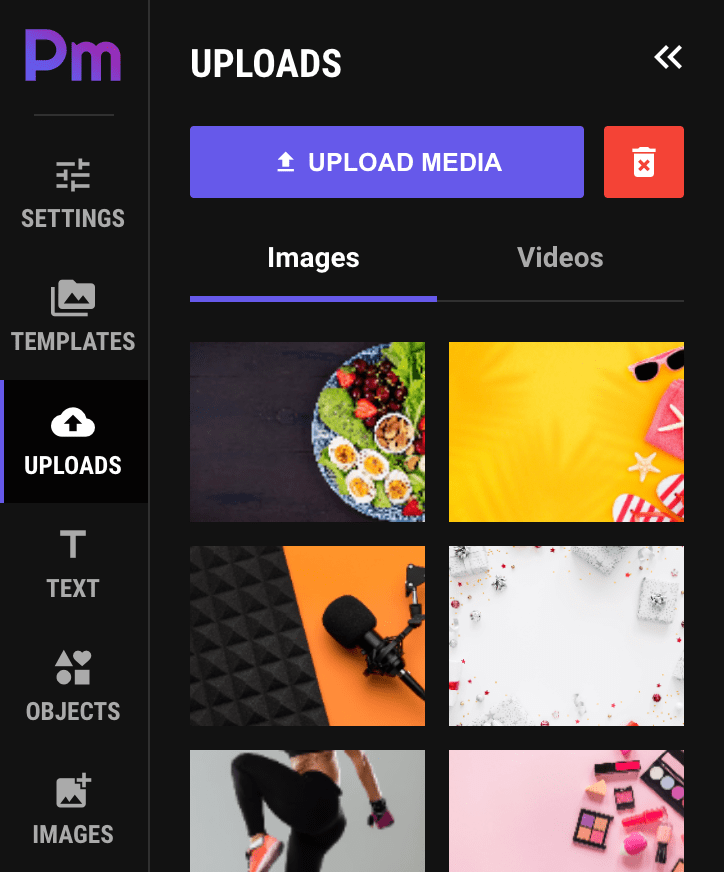
Users can upload their own images (png,jpeg,webp,svg) and videos (mp4) to Pmotion from "UPLOADS" tab. These files are stored in the users' browser. Not on your server.
The stored files at "Templates->My Templates" and "Audio->Upload Audio" are stored in the user's browser as well.
To add an asset, you can either click on it (to add it in the center of the screen), or drag it in the canvas directly.
Text
Objects
How To Add Your Own Objects To The Library?
1) Create a folder for your SVG files in "Files" folder (For example; "my-objects").
2) Add your SVG files to the index.html file like the following;
<!-- My Objects -->
<p class="row-title">My Objects</p>
<div class="gallery-row">
<div class="grid-item">
<img class="object-svg" draggable="false" src="files/my-objects/1.svg" data-file="files/my-objects/1.svg" />
</div>
<!-- ADD 11 ITEM MORE HERE -->
</div>
<button type="button" class="btn btn-full object-more" data-folder="files/my-objects/" data-offset="12" data-count="48">Load More</button>

<!-- Shapes -->
<p class="row-title">Shapes</p>
...
"data-count" must equal the total number of SVG files in the folder.
SVG file names must be numerically sequential, starting with one. 1.svg, 2.svg, 3.svg etc.
Images
Videos
Audio
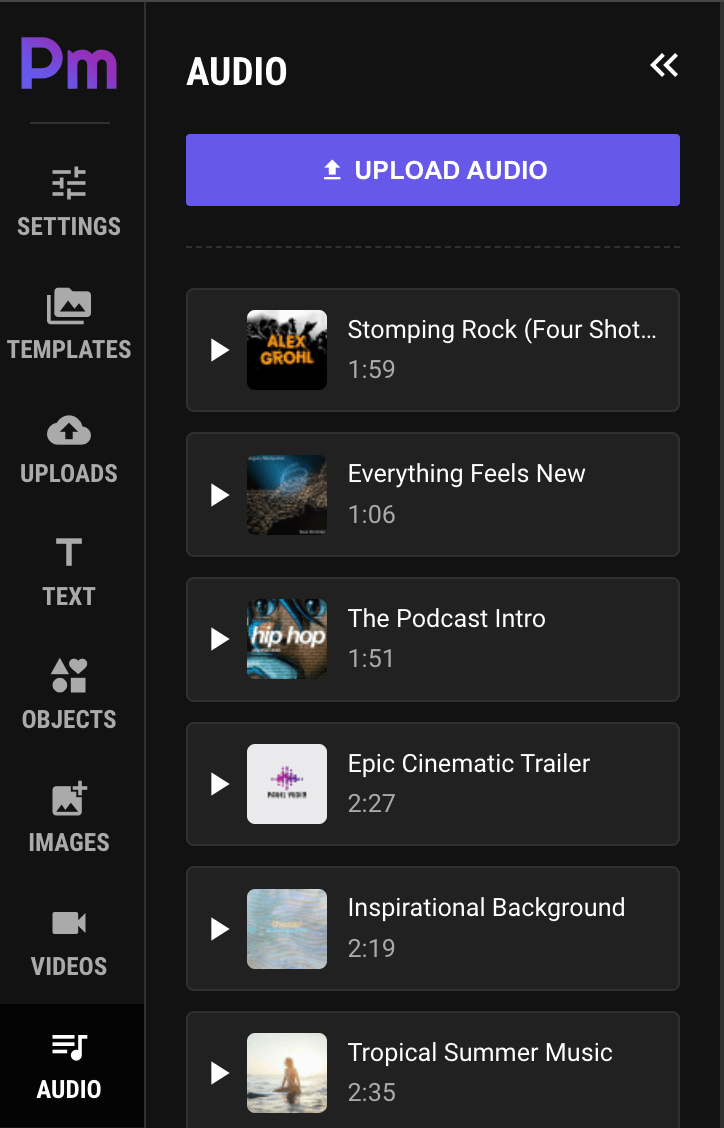
Users can upload their own audio files by clicking "UPLOAD AUDIO" button.
How To Add Your Own Audio Files To The Library?
1) Put your audio file into Files->Audio folder.
2) Create a square thumbnail image for your audio and put it into Files->Audio folder.
3) Add your audio file to the index.html file like the following;
<div id="audio-list">
<div class="audio-item" data-file="files/audio/MY_AUDIO_FILE.mp3">
<div class="audio-preview"><span class="material-icons">play_arrow</span></div>
<img class="audio-thumb" src="files/audio/MY_AUDIO_FILE.png">
<div class="audio-info">
<div class="audio-info-title">TITLE_HERE</div>
<div class="audio-info-duration">DURATION_HERE</div>
</div>
</div>
...
</div>
QR Code
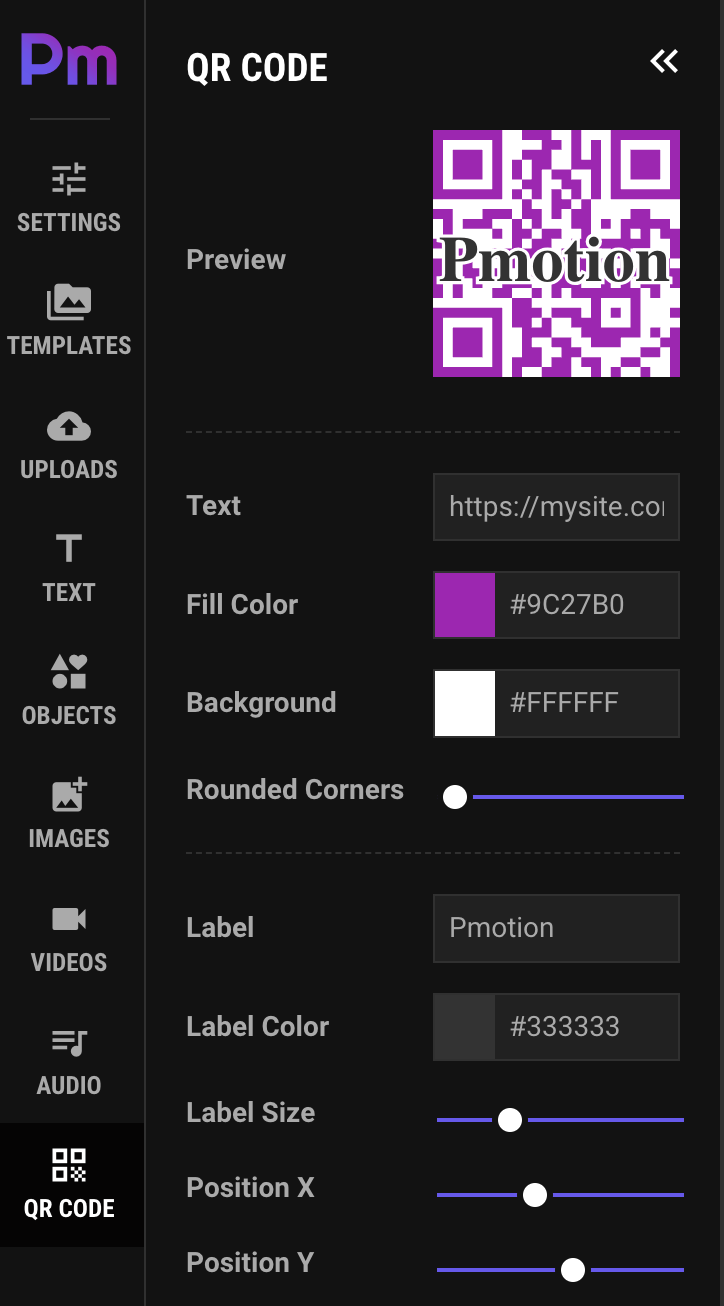
QR codes can store, Website URLs, Contact information, Text messages, Product information, Wi-Fi network credentials, Payment information, Digital tickets and much more!
Save/Download
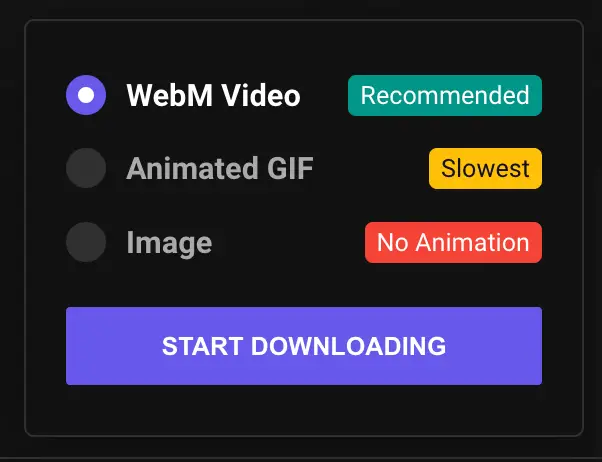
When you’re happy with what you’ve created, you can click on the Download button on the bottom right to open the download panel. You can export in WebM video, animated GIF or as a static image for your current frame.
Pmotion is fully local, so no data is stored in the cloud. Because of this, if you’d like to share your project with someone else, or bring it over a different machine, you’ll have to save the file locally from "Templates -> My Templates". You can use the export button to do so, which will generate a JSON file for you to import later.