Installation
Please note that, if you open index.html file directly on your browser, it may not work properly. Most browsers restricts the kinds of files that pages can load (and methods of loading) when you open them from a file:// URL. You should upload the folder to your hosting or create local server environment on your computer using a third party app. For example; MAMP.
Folders
Assets
This folder contains images.
CSS
This folder contains all CSS files. There are two ready themes (light and dark) you can use.
Files
This folder contains all elements, frames, icons and templates hierarchically.
JS
This folder contains all javascript files. All javascript plugins (except FabricJS) we've used are in js/plugins.min.js file.
Json
This folder contains 2 json file which are required for loading "Google Fonts" and "Material Icons".
Getting Started
To open a new image on the photo editor, click New button. A modal box will appear;
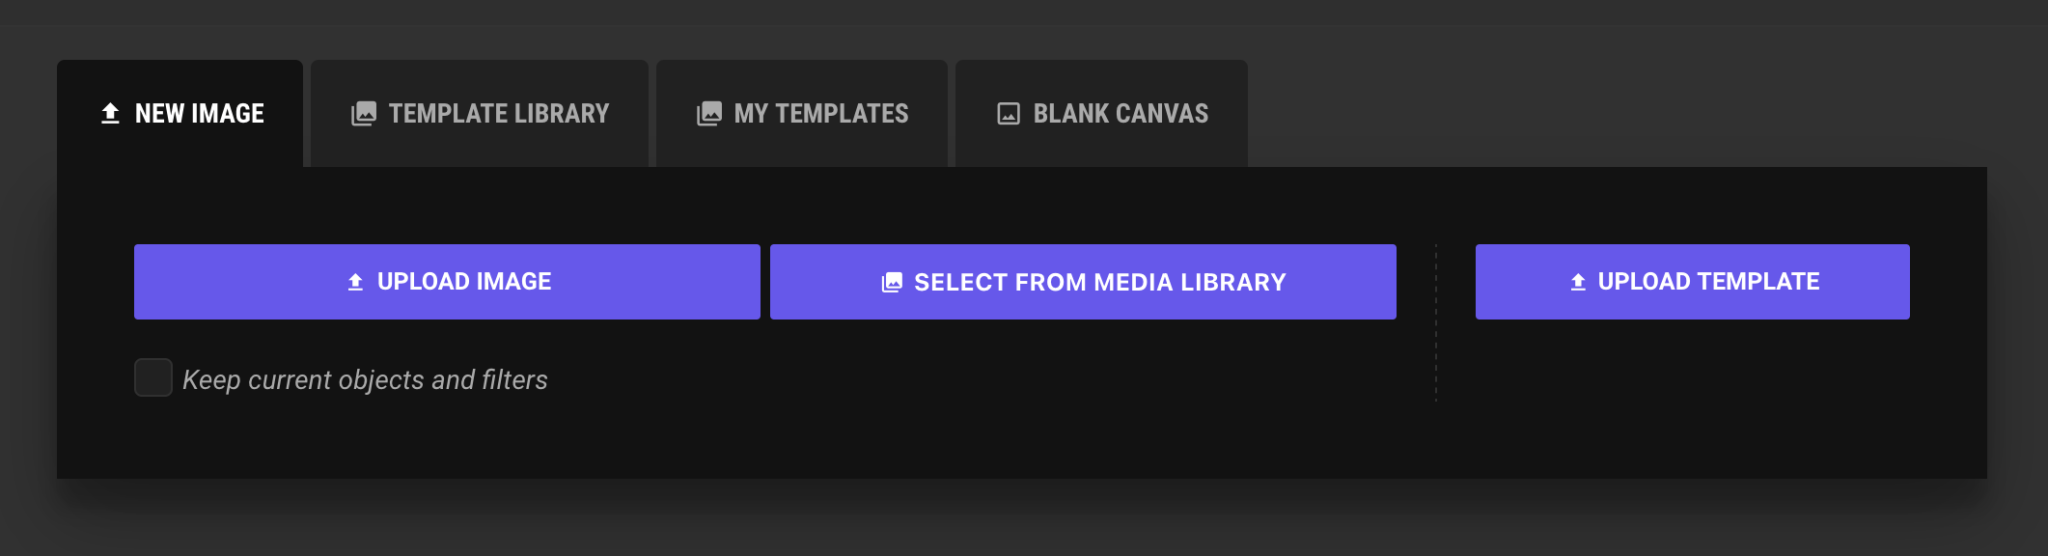
Click this upload image button to select an image from your computer.
Click select from media library button to select an image from WordPress media library.
If you have a template (.json file) which you’ve created with Palleon before, use upload template button to open it on the photo editor.
If you want to open a default image on the first page load find the following line on index.html file;
<img id="palleon-canvas-img" src="" data-filename="" />and add your file url and name like the following;
<img id="palleon-canvas-img" src="assets/placeholder-big.jpg" data-filename="placeholder" />Template Library
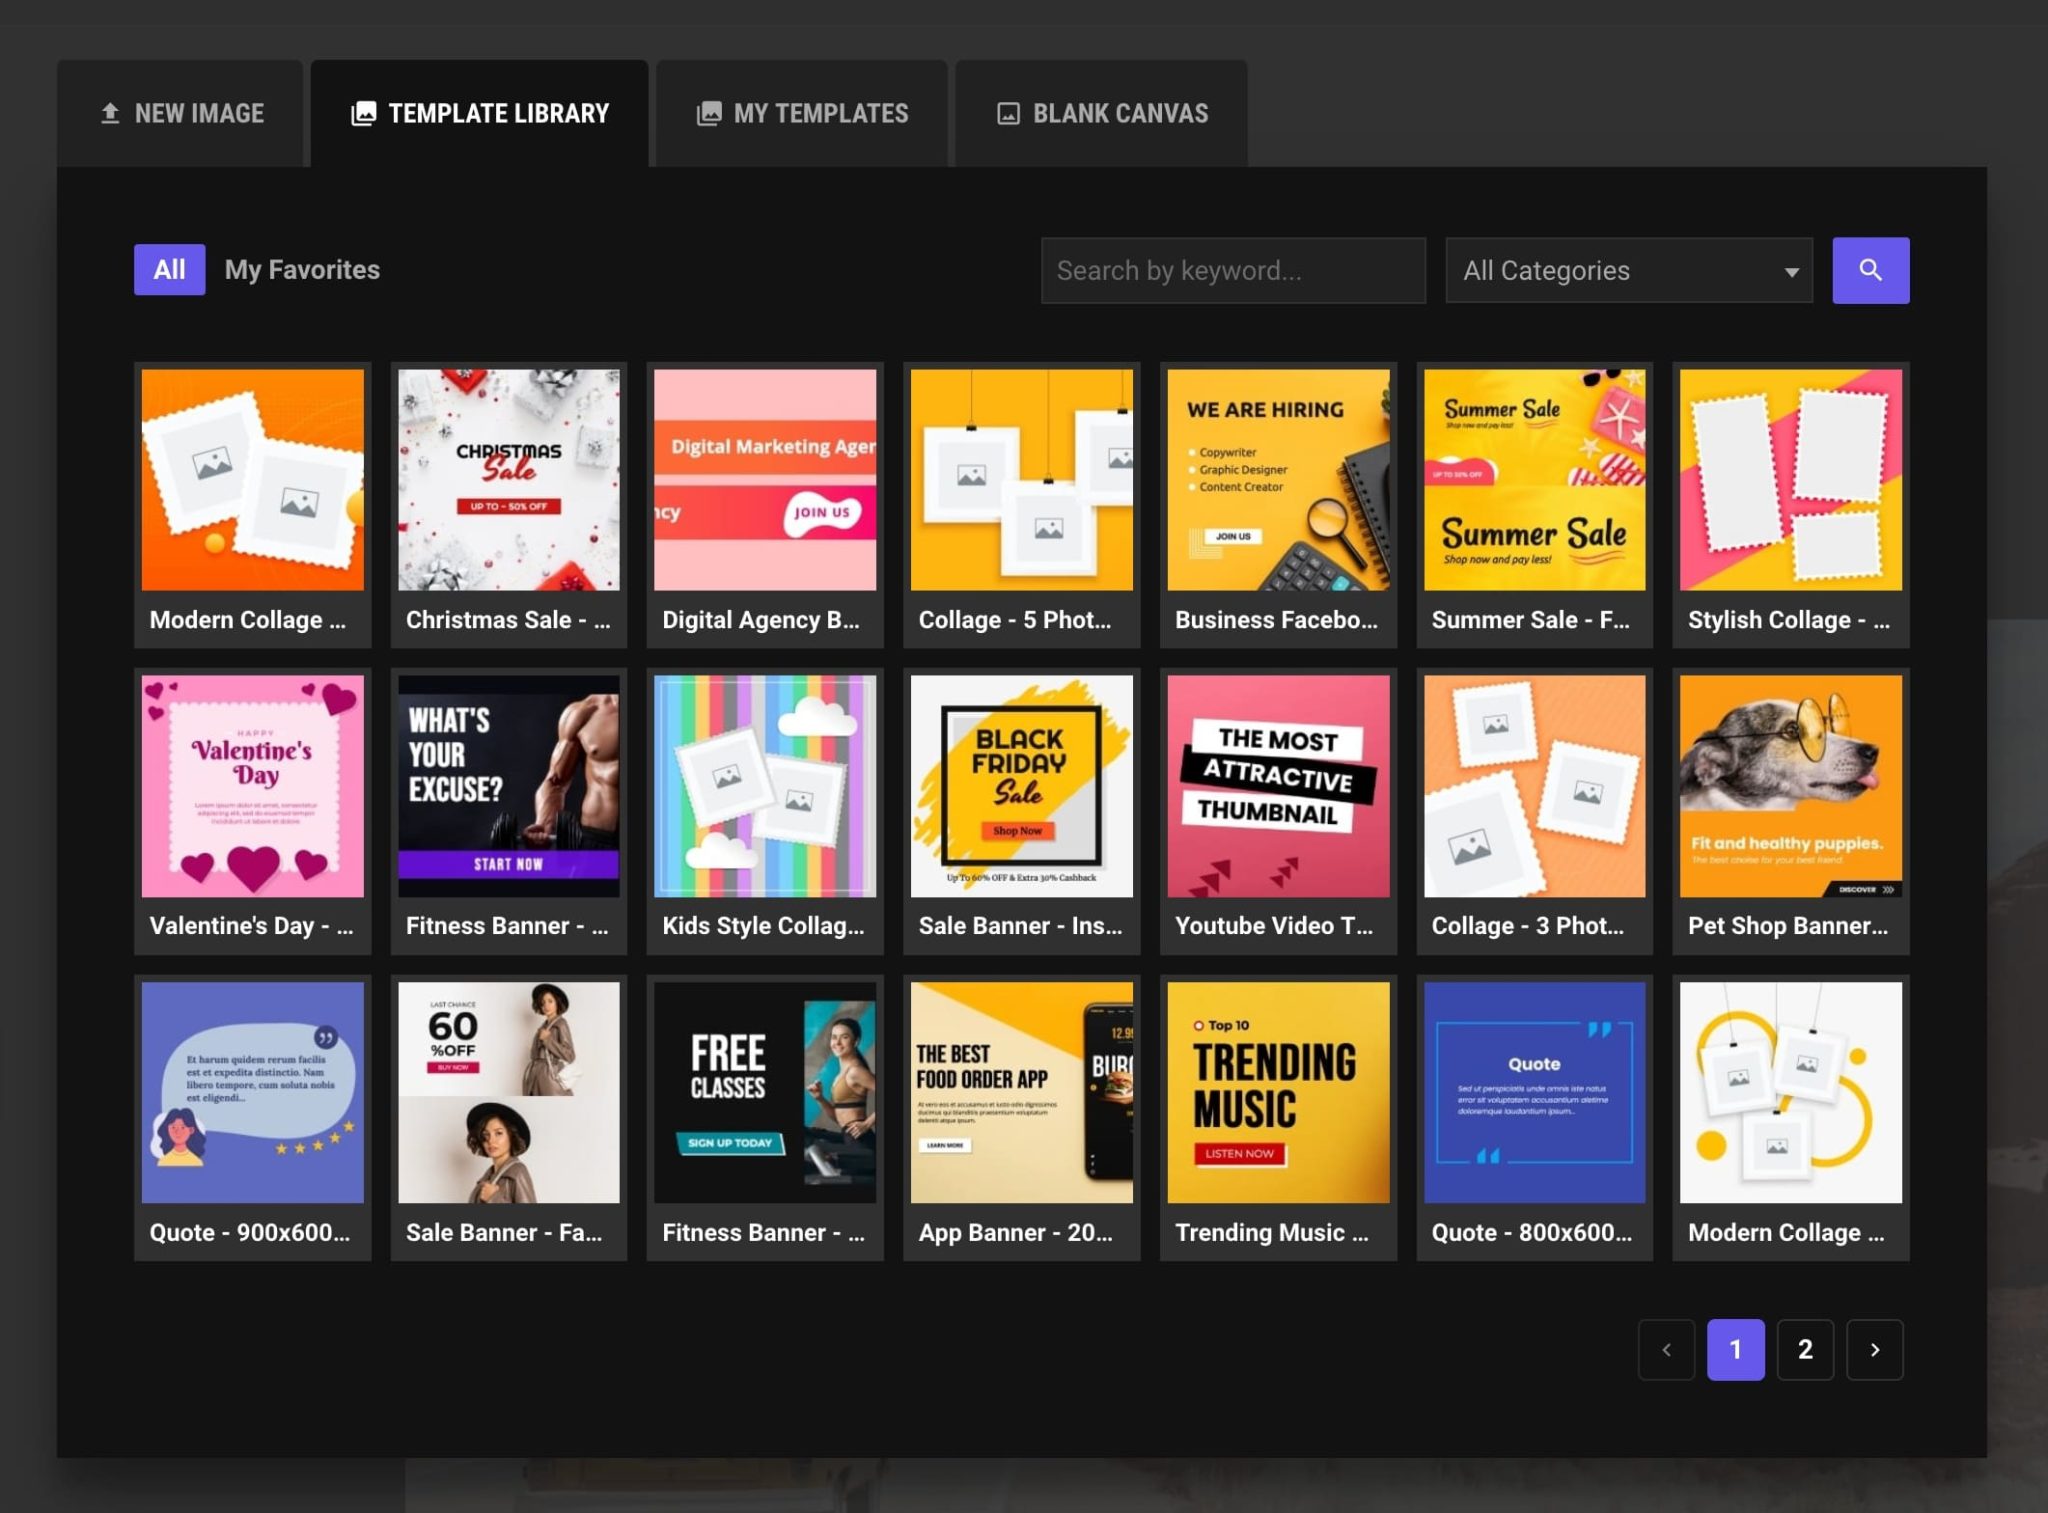
Template library tab: You can find our template collection on this tab. Just click on the template to add it to the canvas.
Blank Canvas
Click “Blank Canvas” tab. Set the dimention, select a background color and click create button.
Panning and Zooming
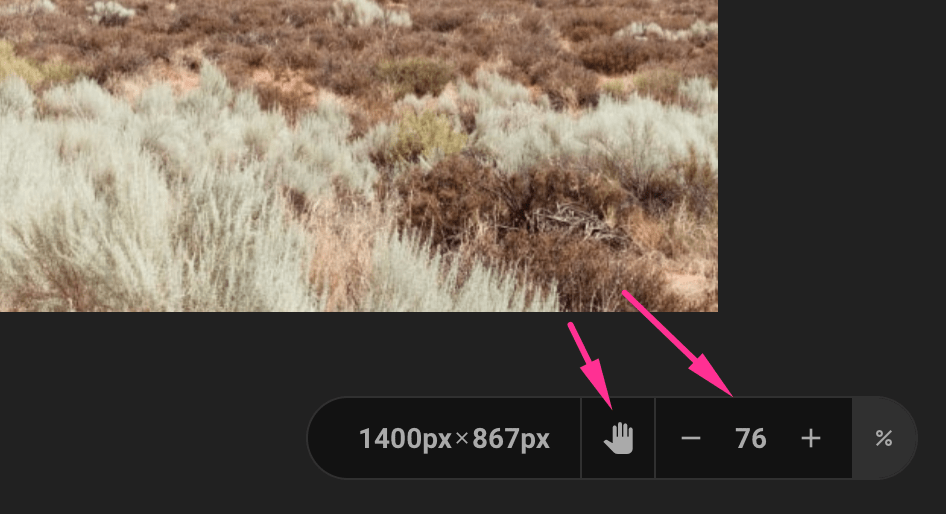
To zoom in/out use the plus/minus icons which is at the bottom right corner of the screen. Please keep in mind that maximum supported zoom in/out levels may change on different browsers and systems.
To pan the image, click “hand” icon and drag&drop the image as you want. When you are done, don’t forget to click “hand” icon again to make the layers selectable again.
Modules
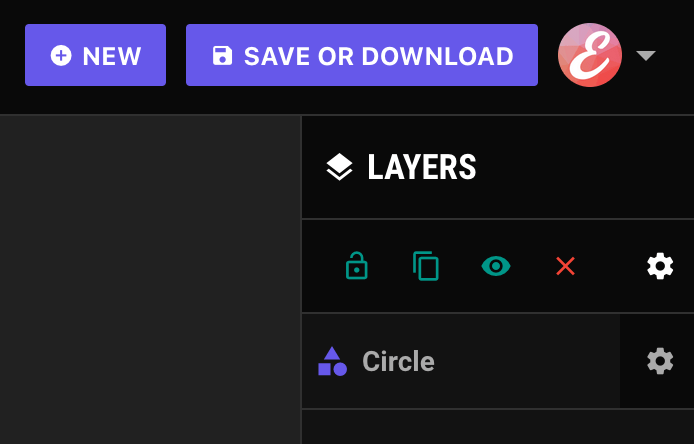
Layers
All objects you’ve added to the canvas, will displayed on this panel. You can drag&drop to change the order of the layers.
To view the layer settings click gear icon;
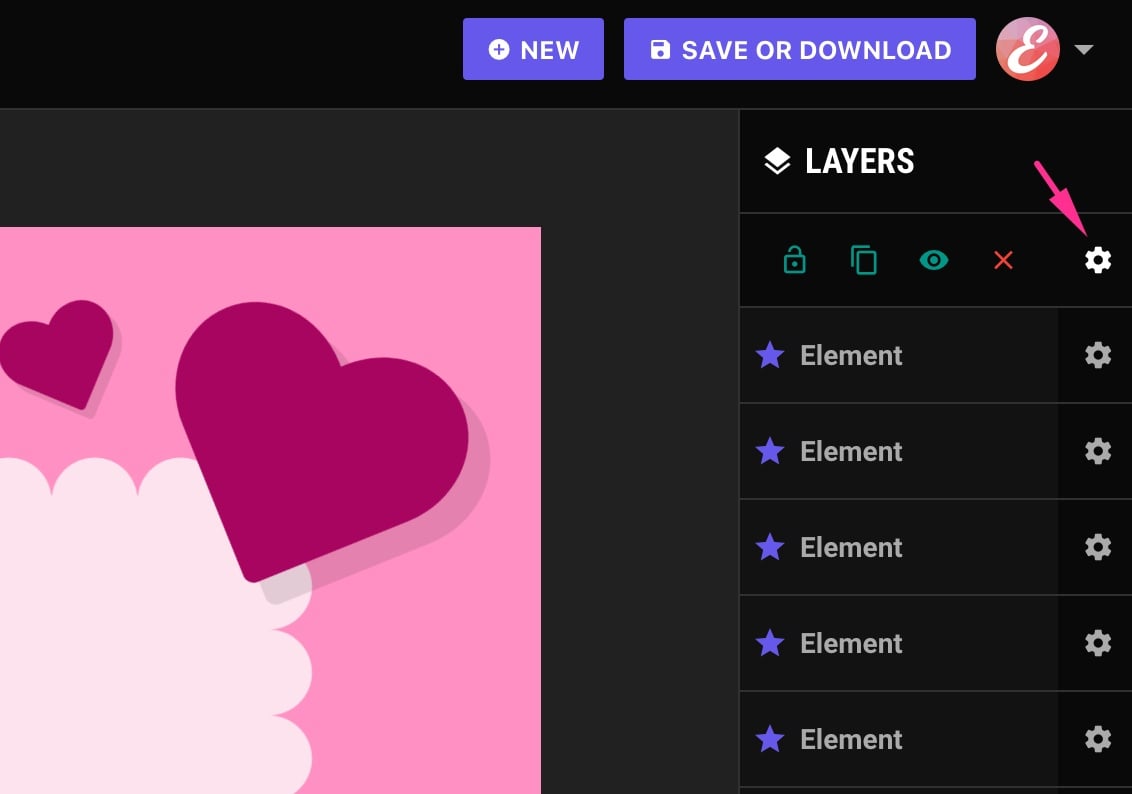
Lock/Unlock: A locked object can not moved or selected on click.
Dublicate: Click this icon to clone the object.
Show/Hide: You can use this button to toggle visibility.
Delete: Click this icon to delete the layer.
For bulk deleting, you can use the dropdown menu at the bottom of the panel.
Adjust
There are 2 section on this panel;
1) You can crop, resize or rotate your images easily from this section;
2) This section contains all image manipulation settings. You can use ready to use image filters from Quick Filters tab or you can combine other filter settings such as gamma, contrast,saturation etc. to create an unique filter on your image;
Note: This section is available only if you are editing an image. If you are working on a blank canvas, the section will not be available since there is no background image.
Photo Frames
You can find beautiful photo frames for your images on our frames gallery. Just click on a frame to add it to the canvas.
All: All frames are on this tab.
My favorites: Click the star icon on any frame, and you will see it here next time you visit.
Settings: You can rotate or flip the frame to get the best result according to your image ratio. Currently, the color setting is working on only Grunge frames.
Text
Palleon allows you to add as many text as you want to the canvas. You can customize the text as you wish using the rich set of customization settings such as color, font size, font family etc.
Image
You can add as many image as you want to the canvas. You can upload the image from your computer or select one of the images on the WordPress media library. When you add the image, the customization settings will appear.
Shapes
Shapes are useful elements that may help you to create contrast background for your texts or to create decorative patterns. The customization settings will appear when you add or select a shape.
Elements
Element library comes with carefully selected single color SVG graphics which are integrated with Palleon. You can use elements to create attractive banners, social media posts, video thumbnails etc.
All: All elements you can use are on this tab.
My favorites: Click the star icon on any element, and you will see it here next time you visit.
Settings: An element must be selected to view the customization settings.
Brushes
You can use all brushes except eraser, to paint the canvas freely. You can use eraser brush to delete the selected portions of the background image.
Icons
Palleon comes with hundreds of multipurpose icons ready to use. You can also upload your custom SVG files to the canvas. Please keep in mind that SVG files are made by different designers using different softwares. So, some custom SVG files may not displayed properly on the canvas.
APPS
Palleon comes with useful apps such as QR code generator, barcode generator, triangle art, multiavatar, cryptocurrency and country flags.
Canvas Ruler
You can use the ruler to align your elements properly and fix spacing issues.
Settings
If you are working on a blank canvas, you can change the background color from this section. This section also contains user preferences.
Settings
Palleon is built on JQuery and FabricJS. So, starting from FabricJs Docs may be a good idea to learn how FabricJs works.
We recommend you not to edit original js/palleon.js file if it is not necessary. You can add your custom javascript functions to js/custom.js file and play with the settings. We added some sample functions for you. You can find all you need to integrate Palleon with your app on this file.
baseURL: You may need to add the url of the main directory when you upload it to your site. For example;
baseURL: "http://www.mysite.com/palleon-js/",API Settings
With Pexels and Pixabay integrations, you can browse millions of high-quality royalty free stock images from Palleon.
Pixabay: You must get an API key from your Pixabay account. Creating account and getting API key is free. After signing-in you can find your API key on this page.
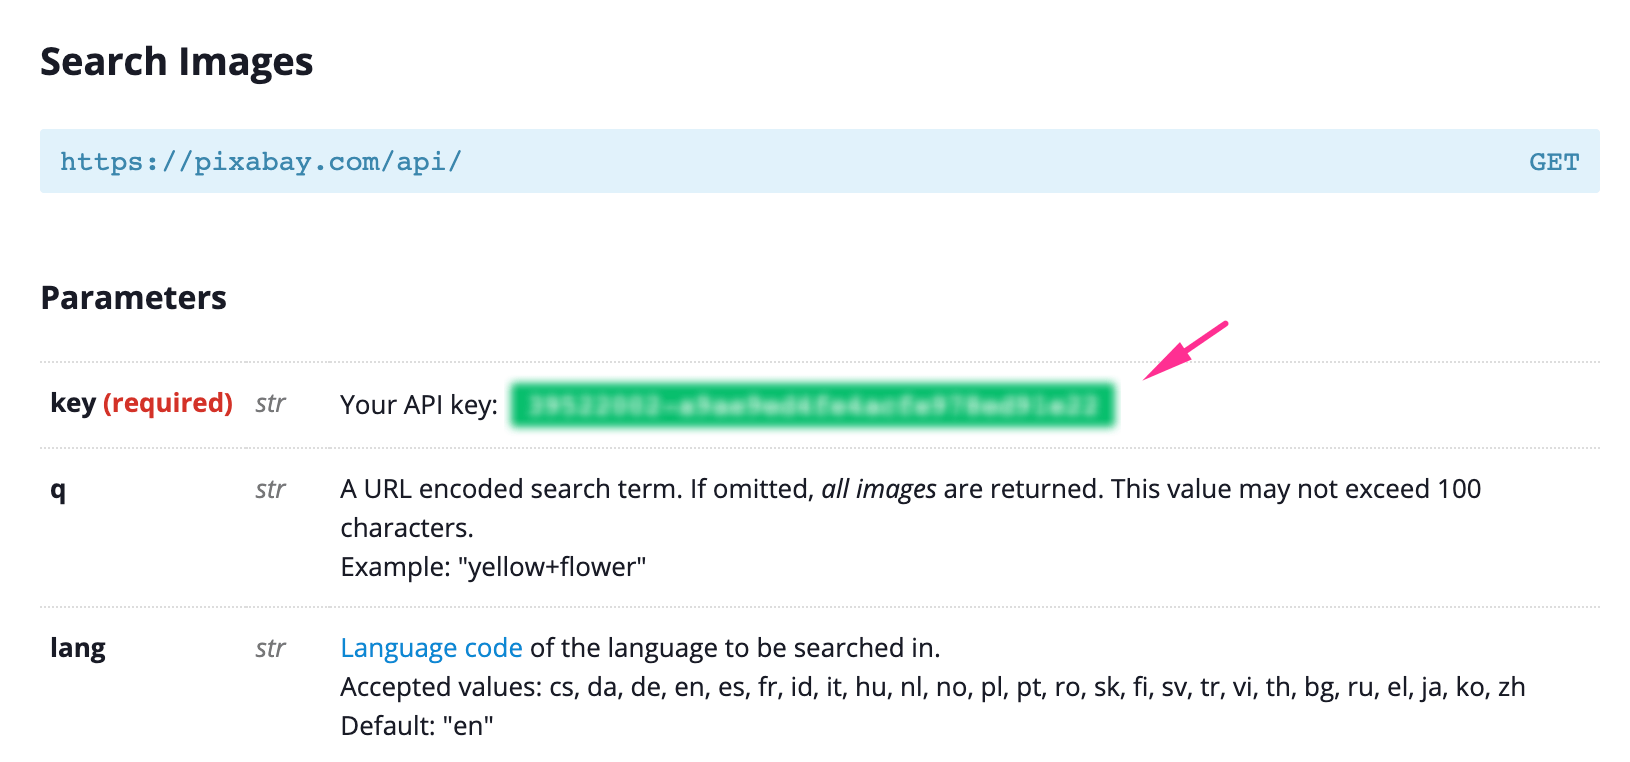
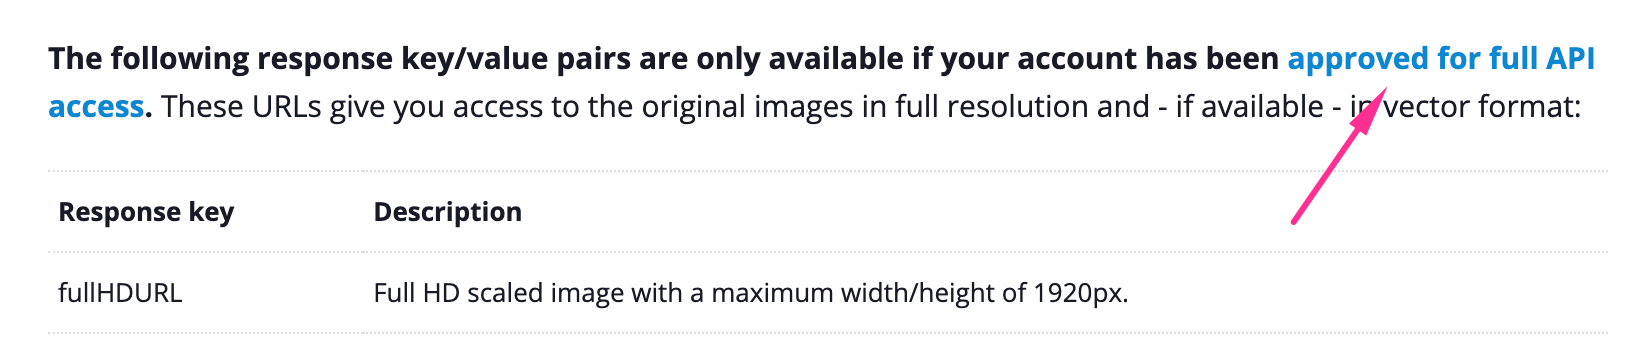
As default image size is a maximum width/height of 1280px. To get the full HD image (maximum width/height of 1920px) url instead, your account should be approved for full API access. You can request full API access from the API page.
Pexels: You must get an API key from your Pexels account. Creating account and getting API key is free. Click here to get your API key.
//////////////////////* API SETTINGS *//////////////////////

PexelsApiKey: 'YOUR_API_KEY', // Your Pexels API key. @see https://www.pexels.com/api/documentation/
PexelsPagination: 20, // Max. number of images to show.
PexelsLanguage: 'en-US', // The locale of the search you are performing. The current supported locales are: 'en-US' 'pt-BR' 'es-ES' 'ca-ES' 'de-DE' 'it-IT' 'fr-FR' 'sv-SE' 'id-ID' 'pl-PL' 'ja-JP' 'zh-TW' 'zh-CN' 'ko-KR' 'th-TH' 'nl-NL' 'hu-HU' 'vi-VN' 'cs-CZ' 'da-DK' 'fi-FI' 'uk-UA' 'el-GR' 'ro-RO' 'nb-NO' 'sk-SK' 'tr-TR' 'ru-RU'
PexelsImgSize: 'large2x', // Valid image sizes are; original large2x large medium small portrait landscape
PixabayApiKey: 'YOUR_API_KEY', // Your Pixabay API key. @see https://pixabay.com/api/docs/
PixabayPagination: 16, // Max. number of images to show.
PixabayLanguage: 'en', // The locale of the search you are performing. Accepted values: cs, da, de, en, es, fr, id, it, hu, nl, no, pl, pt, ro, sk, fi, sv, tr, vi, th, bg, ru, el, ja, ko, zh
PixabaySafeSearch: 'false', // A flag indicating that only images suitable for all ages should be returned. Accepted values: "true", "false".
PixabayEditorsChice: 'false', // Select images that have received an Editor's Choice award. Accepted values: "true", "false".
apiCaching: true, // Browser caching for API requests. Boolean value: true or false
Canvas Settings
//////////////////////* CANVAS SETTINGS *//////////////////////

fontFamily: "'Helvetica Neue', 'Helvetica', 'Arial', sans-serif", // Should be a web safe font
fontSize: 60, // Default font size
fontWeight: 'normal', // e.g. bold, normal, 400, 600, 800
fontStyle: 'normal', // Possible values: "", "normal", "italic" or "oblique".
canvasColor: 'transparent', // Canvas background color
fill: '#000', // Default text color
stroke: '#fff', // Default stroke color
strokeWidth: 0, // Default stroke width
textBackgroundColor: 'rgba(255,255,255,0)', // Default text background color
textAlign: 'left', // Possible values: "", "left", "center" or "right".
lineHeight: 1.2, // Default line height.
borderColor: '#000', // Color of controlling borders of an object (when it's active).
borderDashArray: [4, 4], // Array specifying dash pattern of an object's borders (hasBorder must be true).
borderOpacityWhenMoving: 0.5, // Opacity of object's controlling borders when object is active and moving.
borderScaleFactor: 2, // Scale factor of object's controlling borders bigger number will make a thicker border border is 1, so this is basically a border thickness since there is no way to change the border itself.
editingBorderColor: 'rgba(0,0,0,0.5)', // Editing object border color.
cornerColor: '#fff', // Color of controlling corners of an object (when it's active).
cornerSize: 12, // Size of object's controlling corners (in pixels).
cornerStrokeColor: '#000', // Color of controlling corners of an object (when it's active and transparentCorners false).
cornerStyle: 'circle', // Specify style of control, 'rect' or 'circle'.
transparentCorners: false, // When true, object's controlling corners are rendered as transparent inside (i.e. stroke instead of fill).
cursorColor: '#000', // Cursor color (Free drawing)
cursorWidth: 2, // Cursor width (Free drawing)
enableGLFiltering: true, // set false if you experience issues on image filters.
textureSize: 4096, // Required for enableGLFiltering
watermark: false, // true or false
watermarkText: 'https://palleon.website/', // The watermark text
watermarkFontFamily: 'Georgia, serif', // Should be a web safe font
watermarkFontStyle: 'normal', // Possible values: "", "normal", "italic" or "oblique".
watermarkFontColor: '#000', // Watermark font color
watermarkFontSize: 40, // Watermark font size (integer only)
watermarkFontWeight: 'bold', // e.g. bold, normal, 400, 600, 800
watermarkBackgroundColor: '#FFF', // Watermark background color
watermarkLocation: 'bottom-right', // Possible values: "bottom-right", "bottom-left", "top-left" and "top-right".
templatePreview: true, // true or false
Custom Functions
You can add your own functions into this function;
customFunctions: function(selector, canvas, lazyLoadInstance) {
/**
* @see http://fabricjs.com/fabric-intro-part-1#canvas
* You may need to update "lazyLoadInstance" if you are going to populate items of a grid with ajax.
* lazyLoadInstance.update();
* @see https://github.com/verlok/vanilla-lazyload
*/

// You can put your custom functions here.
},
Translation Strings
To translate the strings which are used in palleon.js file, open index.html file and find and edit the following code which is at the bottom of the page.
var palleonParams = {
"textbox": "Enter Your Text Here",
"object": "Object",
"loading": "Loading...",
"loadmore": "Load More",
"saved": "Saved!",
"imgsaved": "Image is saved.",
"tempsaved": "Template is saved.",
"freeDrawing": "Free drawing",
"frame": "Frame",
"image": "Image",
"circle": "Circle",
"square": "Square",
"rectangle": "Rectangle",
"triangle": "Triangle",
"ellipse": "Ellipse",
"trapezoid": "Trapezoid",
"pentagon":"Pentagon",
"octagon":"Octagon",
"emerald": "Emerald",
"star": "Star",
"element": "Element",
"customSvg": "Custom SVG",
"success": "Success",
"error": "Error",
"delete": "Delete",
"duplicate": "Duplicate",
"showhide": "Show/Hide",
"lockunlock": "Lock/Unlock",
"text": "Text",
"started": "Editing started.",
"added": "added.",
"removed": "removed.",
"resized": "resized.",
"edited": "edited.",
"replaced": "replaced.",
"rotated": "rotated.",
"moved": "moved.",
"scaled": "scaled.",
"flipped": "flipped.",
"cropped": "cropped.",
"bg": "Canvas",
"filter": "filter",
"showRulers":"Show rulers",
"hideRulers":"Hide rulers",
"showGuides":"Show guides",
"hideGuides":"Hide guides",
"clearAllGuides":"Clear all guides",
"question1":"Are you sure you want clear the history?",
"question2":"Are you sure you want to delete the layers?",
"question3":"Are you sure you want to crop the image?",
"question4":"Are you sure you want to resize the image?",
"noDuplicate":"You can not duplicate multiple objects. Please select single object to duplicate.",
"warning": "Warning",
"qrCode": "QR Code",
"startDrawing": "Start Drawing",
"stopDrawing": "Stop Drawing",
"erased": "Pixels erased.",
"loadMore": "Load More",
"wrong": "Something went wrong.",
"apiKeyRequired": "API key is required.",
"pexelsApiError": "Error connecting to Pexels API.",
"pixabayApiError": "Error connecting to Pixabay API.",
"nothing": "Nothing found.",
"loadMore": "Load More",
"favorited": "The item has been favorited.",
"unfavorited": "The item has been unfavorited.",
"nofavorites": "No favorites yet",
"nofavoritesdesc": "Click the star icon on any item, and you will see it here next time you visit."
};
Frequently asked questions
How to add my own templates?
1) Create something with the image editor and download as template (You can also upload this JSON file directly to the editor from New->Upload Template).
2) Put the JSON file into Files->Templates->Json folder.
3) Create a thumbnail image and put the image into Files->Templates->img folder.
4) Open index.html file and add your template into #palleon-templates-grid div like the following example;
<div id="palleon-templates-grid" class="palleon-grid template-grid template-selection paginated" data-perpage="21">

    ...

    <div class="grid-item" data-keyword="MY TEMPLATE" data-category="blog-banners">

        <div class="template-favorite">

            <button type="button" class="palleon-btn-simple star" data-elementid="ELEMENT_ID"><span class="material-icons">star_border</span></button>

        </div>

        <div class="palleon-masonry-item-inner palleon-select-template" data-json="YOUR_JSON_URL">

            <div class="palleon-img-wrap">

                <div class="palleon-img-loader"></div>

                <img class="lazy" data-src="YOUR_THUMBNAIL_URL" title="MY TEMPLATE" />

            </div>

            <div class="palleon-masonry-item-desc">MY TEMPLATE</div>

        </div>

    </div>

</div>
The following data attributes are important;
data-perpage: The number of templates on the page. Required for pagination plugin.
data-keyword: The keyword which is used on template search.
data-category: The category which is associated with the template.
data-json: The url of the JSON (template) file.
data-src: The url of the thumbnail image. We used lazyload so there is no need to add src attribute.